Framework Guides
One can integrate TypeflowAI into their app using multiple options! Checkout the options below that we provide! If you are looking for something else, please send us an email to support@typeflowai.com and we would be glad to help.


Prerequisites
Before getting started, make sure you have:
- A web application in your desired framework is set up and running.
- A TypeflowAI account with access to your environment ID and API host. You can find these in the Setup Checklist in the Settings:
HTML
All you need to do is copy a <script> tag to your HTML head, and that’s about it!
HTML
<!-- START TypeflowAI Workflows -->
<script type="text/javascript">
    !function(){var t=document.createElement("script");t.type="text/javascript",t.async=!0,t.src="https://unpkg.com/@typeflowai/js@^1.1.0/dist/index.umd.js";var e=document.getElementsByTagName("script")[0];e.parentNode.insertBefore(t,e),setTimeout(function(){window.typeflowai.init({environmentId: "<your-environment-id>", apiHost: "<api-host>"})},500)}();
    </script>
<!-- END TypeflowAI Workflows -->
Required customizations to be made
- Name
environment-id- Type
- string
- Description
TypeflowAI Environment ID.
- Name
api-host- Type
- string
- Description
URL of the hosted TypeflowAI instance.
Now visit the Validate your Setup section to verify your setup!
ReactJS
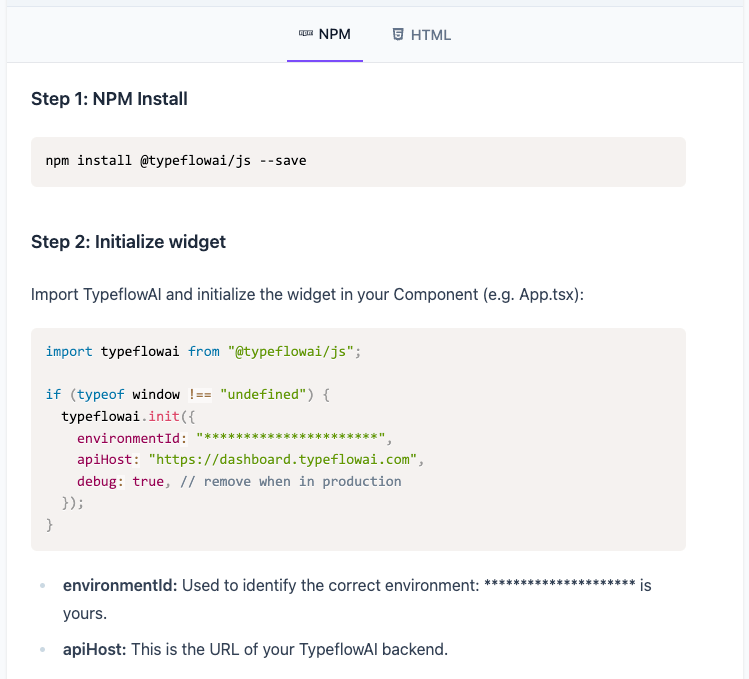
Install the TypeflowAI SDK using one of the package managers ie npm,pnpm,yarn.
Install TypeflowAI JS library
npm install @typeflowai/js
Now, update your App.js/ts file to initialise TypeflowAI.
src/App.js
// other imports
import typeflowai from "@typeflowai/js";

if (typeof window !== "undefined") {
  typeflowai.init({
    environmentId: "<environment-id>",
    apiHost: "<api-host>",
  });
}

function App() {
  // your own app
}

export default App;
Required customizations to be made
- Name
environment-id- Type
- string
- Description
TypeflowAI Environment ID.
- Name
api-host- Type
- string
- Description
URL of the hosted TypeflowAI instance.
What are we doing here?
The app initializes 'typeflowai' when it's loaded in a browser environment (due to the typeof window !== "undefined" check) and then renders your components or content.
Now visit the Validate your Setup section to verify your setup!
NextJS
NextJs projects typically follow two main conventions: the App Directory and the Pages Directory. To ensure smooth integration with the TypeflowAI SDK, which operates solely on the client side, follow the guidelines for each convention below:
- App directory: You will have to define a new component in
app/typeflowai.tsxfile and call it in yourapp/layout.tsxfile. - Pages directory: You will have to visit your
_app.tsxand just initialise TypeflowAI there.
Code snippets for the integration for both conventions are provided to further assist you.
Install TypeflowAI JS library
npm install @typeflowai/js
App Directory
app/typeflowai.tsx
"use client";
import typeflowai from "@typeflowai/js";
import { usePathname, useSearchParams } from "next/navigation";
import { useEffect } from "react";

export default function TypeflowAIProvider() {
  const pathname = usePathname();
  const searchParams = useSearchParams();

useEffect(() => {
typeflowai.init({
environmentId: "<environment-id>",
apiHost: "<api-host>",
});
}, []);

useEffect(() => {
typeflowai?.registerRouteChange();
}, [pathname, searchParams]);

return null;
}
app/layout.tsx
// other imports
import TypeflowAIProvider from "./typeflowai";

export default function RootLayout({ children }: { children: React.ReactNode }) {
  return (
    <html lang="en">
      <TypeflowAIProvider />
      <body>{children}</body>
    </html>
  );
}
Pages Directory
src/pages/_app.tsx
// other import
import { useRouter } from "next/router";
import { useEffect } from "react";

import typeflowai from "@typeflowai/js";

if (typeof window !== "undefined") {
  typeflowai.init({
    environmentId: "<environment-id>",
    apiHost: "<api-host>",
  });
}

export default function App({ Component, pageProps }: AppProps) {
  const router = useRouter();

  useEffect(() => {
    // Connect next.js router to TypeflowAI
    const handleRouteChange = typeflowai?.registerRouteChange;
    router.events.on("routeChangeComplete", handleRouteChange);

    return () => {
      router.events.off("routeChangeComplete", handleRouteChange);
    };
  }, []);
  return <Component {...pageProps} />;
}
Required customizations to be made
- Name
environment-id- Type
- string
- Description
TypeflowAI Environment ID.
- Name
api-host- Type
- string
- Description
URL of the hosted TypeflowAI instance.
What are we doing here?
First we need to initialize the TypeflowAI SDK, making sure it only runs on the client side. To connect the Next.js router to TypeflowAI and ensure the SDK can keep track of every page change, we are registering the route change event.
Now visit the Validate your Setup section to verify your setup!
VueJs
Integrating the TypeflowAI SDK with Vue.js is a straightforward process. We will make sure the SDK is only loaded and used on the client side, as it's not intended for server-side usage.
Install TypeflowAI JS library
npm install @typeflowai/js
src/typeflowai.js
import typeflowai from "@typeflowai/js";

if (typeof window !== "undefined") {
  typeflowai.init({
    environmentId: "<environment-id>",
    apiHost: "<api-host>",
  });
}

export default typeflowai;
src/main.js
// other imports
import typeflowai from "@/typeflowai";

const app = createApp(App);

app.use(router);

app.mount("#app");

router.afterEach((to, from) => {
  if (typeof typeflowai !== "undefined") {
    typeflowai.registerRouteChange();
  }
});
Required customizations to be made
- Name
environment-id- Type
- string
- Description
TypeflowAI Environment ID.
- Name
api-host- Type
- string
- Description
URL of the hosted TypeflowAI instance.
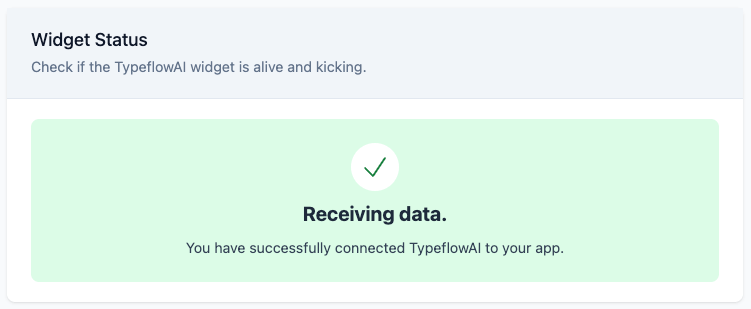
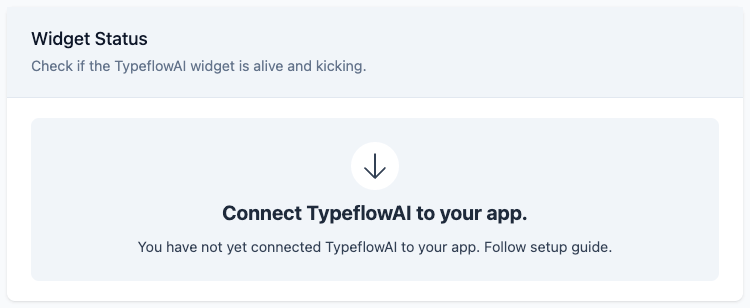
Validate your setup
Once you have completed the steps above, you can validate your setup by checking the Setup Checklist in the Settings. Your widget status indicator should go from this:
To this: